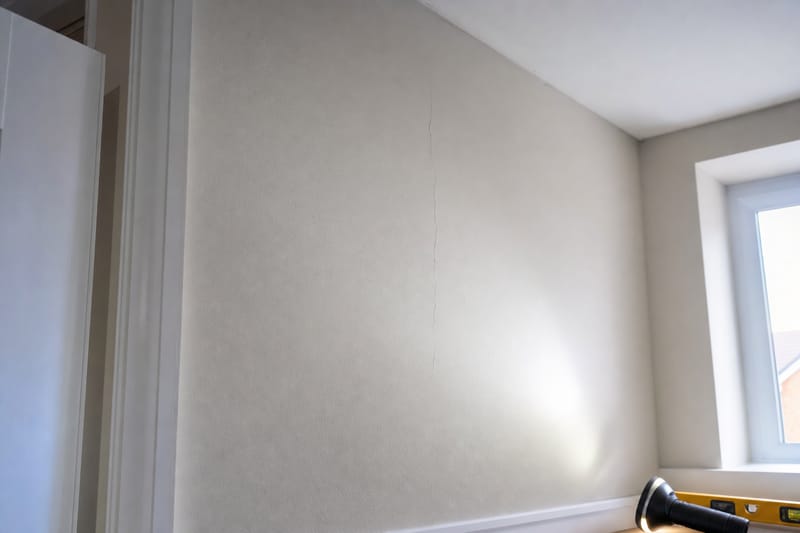
Almost every new build home develops some cracking in its first twelve to eighteen months. A hairline line appears above a doorframe, a corner of the lounge ceiling, or where two sheets of plasterboard meet — and the natural reaction is alarm. Is this a new build settlement crack that will simply need filling and painting, or is it a genuine snagging defect that points to something wrong with the build?
The honest answer is that new build plaster cracks are, in the overwhelming majority of cases, completely normal. New homes are built from materials that are still wet or "green" when you move in — timber frames, plasterboard skim, screed floors and mortar joints all lose moisture over their first year, and as they dry out they shrink very slightly. That shrinkage, combined with the frame settling under its own weight and the property experiencing its first full cycle of heating seasons, produces small cracks that are cosmetic rather than structural.
But "usually normal" is not the same as "always fine to ignore". Certain crack patterns — particularly diagonal cracks over openings, cracks that are widening month on month, or cracks running through brickwork rather than just plaster — can signal a genuine building defect that should go into a formal snagging plaster and paintwork report rather than being written off as settlement.
This guide walks through why new builds crack, how to tell ordinary settlement from a defect worth escalating, how to measure and monitor a crack properly, what your warranty provider expects from you, and how the "making good" process should work once cracks are logged. If you're building your wider defect list at the same time, it's worth reading alongside How to Create a Professional Snagging Report and Post-Completion Snagging: Your Rights and Timelines.
Why new builds crack in the first place
Understanding the mechanics helps you judge whether a crack is expected or not. New homes move for several distinct reasons, often overlapping in the first year.
Drying shrinkage
Plaster skim, screed and mortar all contain water when applied and lose it gradually as the building dries out — a process that can take a full year or more, especially in homes finished over autumn and winter when drying is slower. As moisture leaves, these materials contract by a fraction of a millimetre per metre, which is enough to open fine cracks at natural weak points: where plasterboard sheets join, around service penetrations, and at corners.
Timber movement
Timber-framed and timber-roofed new builds use structural timber that still carries some moisture content on site. Over the first heating season, central heating dries the timber further, causing it to shrink slightly along its length and width. This is most visible where a timber stud or joist sits directly behind plasterboard — classic locations are above door and window openings, and along ceiling-to-wall junctions.
Thermal and moisture cycling
A new home's first winter is often the first time the building fabric experiences a full heating cycle. Radiators warm timber and masonry unevenly, causing minor expansion and contraction that can reopen or extend hairline cracks that first appeared during drying.
Foundation and frame settlement
All buildings settle slightly into the ground once the full weight of the structure, roof and finishes is applied. On most sites this settlement is even and imperceptible. Differential settlement — where one part of the building moves more than another, for example over a manhole, an extension junction, or an area of variable ground — is what produces the more concerning diagonal and stepped cracks discussed later in this guide.
Workmanship variables
Not every crack is purely material physics. Plaster applied too thickly, over-sanded corners, inadequate scrim tape over joints, or plasterboard fixed with too few screws can all crack earlier and more visibly than a well-executed finish would. This is the category that most clearly belongs in a snagging report, because it reflects how the work was done rather than an unavoidable material property.
The same crack width can mean two very different things depending on where it is and what's behind it — location and pattern matter more than size alone.
Normal settlement cracks vs cracks that need investigating
The single most useful skill in this whole process is learning to "read" a crack — its width, direction, and location tell you far more than whether it looks alarming at first glance.
Typical characteristics of normal shrinkage cracks
- Hairline width — typically under 1mm, often barely wider than a pencil line.
- Straight and vertical or horizontal, following a plasterboard joint, corner, or the line above a door or window head.
- Appear only in plaster or paint finish, with no crack visible in the brickwork or blockwork behind or around it.
- Static or very slowly widening — stable within a millimetre over several months.
- Concentrated at known weak points: ceiling/wall junctions, above openings, around loft hatches, at staircase strings, where new plasterboard meets an existing wall.
- Appear predominantly in the first 12–18 months and then stop recurring once the property has been through a full heating cycle.
Characteristics that should prompt a closer look
- Diagonal cracks, particularly running from the corner of a window or door opening upward at roughly 45 degrees.
- Stepped cracks following the mortar joints in external brickwork, rather than running through the bricks themselves.
- Cracks wider than 3mm, or any crack you can fit a 10p or 20p coin's edge into.
- Cracks that are visibly wider at one end than the other (tapering), suggesting one side of the structure is moving more than the other.
- Cracks accompanied by doors or windows that have started sticking, or gaps opening up between a doorframe and the wall.
- Cracking that continues to widen month after month rather than settling down.
- Cracks appearing on both the internal and external leaf in the same location, suggesting the movement runs through the full wall thickness.
- Damp staining, discolouration or a rusty tinge around the crack, which can indicate water ingress or corroding wall ties rather than simple drying shrinkage.
If in doubt, log it anyway. It costs you nothing to report a crack that turns out to be ordinary shrinkage, but a genuine structural issue left unreported for months can become both harder to prove and harder to fix.
How to measure and monitor a crack properly
Before you decide whether a crack is worth escalating beyond routine snagging, spend a few weeks monitoring it properly. A single photo taken once tells you almost nothing; a dated record over time tells you everything.
Step by step monitoring
- Photograph with scale. Place a ruler or a coin next to the crack and take a clear, well-lit photo straight on, not at an angle. Include a wider shot showing the crack's location in the room.
- Measure the width. A cheap crack width gauge (a clear plastic card with graduated lines, widely available for a few pounds) lets you record width to the nearest 0.1mm. Note the widest point.
- Record the length. Mark the two ends of the crack lightly in pencil and measure the total length.
- Date every reading. Write the date directly next to the crack in pencil, or keep a simple spreadsheet with photo, date, width and length.
- Re-check monthly. After the first reading, revisit every four to six weeks for at least three months. A crack that has stopped growing is far less concerning than one still opening up.
- Note the season and heating pattern. Cracks that appear only after the heating is switched on for the first time, or during a hot summer, are consistent with normal thermal movement.
Simple monitoring log
| Date | Location | Width (mm) | Length (mm) | Notes |
|---|---|---|---|---|
| Month 1 | Above lounge door | 0.5 | 150 | First noticed after central heating switched on |
| Month 2 | Above lounge door | 0.6 | 160 | Slight widening, still hairline |
| Month 3 | Above lounge door | 0.6 | 160 | No further movement |
| Month 4 | Above lounge door | 0.6 | 160 | Stable — ready to snag and make good |
This kind of record does two jobs at once. First, it gives you the evidence to decide whether a crack is genuinely stable (in which case it's a straightforward cosmetic snagging item) or actively progressing (in which case it needs a structural assessment before anyone reaches for a filler knife). Second, if a dispute ever arises with your warranty provider about whether a crack existed before or after a particular date, a dated log with photographs is far stronger evidence than memory.
Tools built for this exist too — several dedicated snagging apps let you attach dated photos and measurements to each defect entry automatically, which is covered in more depth in How to Use a Snagging App to Track Defects.
Crack pattern, likely cause and recommended action
Use this table as a quick reference when you spot a new crack. It is a general guide, not a diagnosis — always get a professional opinion for anything in the "investigate" column.
| Pattern / location | Likely cause | Typical category | Recommended action |
|---|---|---|---|
| Hairline crack above internal door or window head | Timber shrinkage / plasterboard joint | Cosmetic snagging | Log, monitor, include in decorating-stage snag list |
| Fine crack at ceiling/wall corner junction | Drying shrinkage at plasterboard scrim joint | Cosmetic snagging | Log and request making good under warranty |
| Hairline crack along staircase string or under stairs | Timber movement | Cosmetic snagging | Log, monitor for widening |
| Diagonal crack from corner of window opening | Localised settlement or lintel movement | Investigate | Monitor with gauge; request warranty provider inspection if it widens |
| Stepped crack through external mortar joints | Differential foundation settlement | Investigate | Request structural assessment before decorating over it |
| Crack wider than 3mm anywhere | Could be multiple causes, none minor | Investigate | Raise formally with builder and warranty provider immediately |
| Crack plus sticking door/window in same area | Frame or opening distortion | Investigate | Get a joiner and structural opinion together |
| Crack with damp staining or rust discolouration | Water ingress or corroding wall tie | Investigate | Treat as urgent — report immediately, do not decorate over |
For guidance on which category a defect falls into more broadly — and how to sequence your reporting so the urgent items get attention first — see How to Prioritise Snagging: Urgent vs Cosmetic Issues.
Never fill or paint over a crack you intend to report. Once decorated, it becomes much harder to prove the crack was present at handover or during the warranty period, and your developer may query the claim.
When to raise a formal snagging report
You don't need to wait for a crack to look serious before logging it — in fact, the opposite approach is safer. Report every crack you notice, however minor, and let the pattern of "cosmetic" versus "investigate" sort itself out through monitoring and your builder's response.
What to include for each crack
- Room and precise location (e.g. "north wall, 30cm left of window reveal, at ceiling junction").
- Dated, scaled photograph.
- Width measurement using a crack gauge where possible.
- Date first noticed, and whether it has changed since.
- Whether it's accompanied by any other symptom — a sticking door, a gap at a skirting board, a draught.
Typical reporting windows
Most builders operate a two-week snagging period immediately after completion, followed by ongoing reporting through your two-year builder warranty and, for structural issues, the 10–12 year structural warranty (NHBC Buildmark, LABC Warranty or Premier Guarantee are the most common providers). Cosmetic plaster cracking is typically covered fully in year one, with cover narrowing in year two to defects that are the builder's fault rather than routine drying shrinkage.
How to submit
Send your snagging list to your developer's customer care team in writing (email creates a paper trail), ideally using a structured PDF or spreadsheet report rather than a scattered series of messages. Reference your plot number and the room location for each item. Keep a copy of every submission and any acknowledgement you receive, including reference numbers if the builder assigns them.
If you're compiling your very first post-completion list, How to Create a Professional Snagging Report covers formatting and structure in detail, and Post-Completion Snagging: Your Rights and Timelines sets out the statutory and contractual timescales you're working within.
Structural cracks: the warning signs you shouldn't decorate over
Genuine structural cracking is rare in a new build within the warranty period, but it does happen — usually linked to ground conditions, foundation design, or a construction error that wasn't caught during building control inspection. Knowing the difference between "annoying but cosmetic" and "get a structural engineer" cracking protects both your home and your ability to claim.
Signs that point towards a structural issue
- Cracks that run through the brick or block itself, not just the mortar joint between them.
- Cracks visible on both faces of a wall in the same location, front and back.
- Cracks that are noticeably wider at the top or bottom than elsewhere (tapering or "trumpet-shaped").
- New or worsening gaps between a bay window and the main wall, or between an extension and the original structure.
- Doors and windows that have started binding, sticking, or no longer closing squarely, especially if this coincides with new cracking nearby.
- Cracks that appear suddenly after a period of very wet or very dry weather, which can indicate movement in a clay subsoil (heave or shrinkage of the ground itself).
- Visible sagging in a ceiling or a floor that feels noticeably springy in one specific area.
What happens if a crack looks structural
Do not attempt to fill, sand or paint over it. Photograph and measure it, then contact your developer's customer care team and your structural warranty provider (NHBC, LABC Warranty, Premier Guarantee or equivalent) at the same time, explaining that you believe the crack may be structural rather than cosmetic. Most warranty providers will arrange an independent inspection rather than relying solely on the builder's own assessment, particularly for cracks reported as potentially structural.
It's worth knowing that building control sign-off (from your local authority or an approved inspector such as LABC) at construction stage does not guarantee zero structural movement afterwards — ground conditions can behave differently once the full building load and drainage patterns are established. LABC vs NHBC Inspections: Understanding Build Quality Oversight explains how these two separate systems — construction-stage inspection and post-completion warranty — fit together.
A structural engineer's report costs money upfront but is rarely wasted: if the crack turns out to be cosmetic, you have independent confirmation; if it's genuine, you have the evidence your warranty claim needs.
What your warranty actually covers, year by year
New build warranties are structured in stages, and what counts as a covered defect changes as the property ages. Understanding this timeline stops you either under-reporting (missing a window) or over-reporting (raising a claim the policy was never designed to cover).
| Period | Who is responsible | What's typically covered for cracking |
|---|---|---|
| 0–2 weeks (initial snagging) | Builder directly | Any visible defect at handover, including existing cosmetic cracks and poor finishing |
| Weeks 2–104 (builder's 2-year warranty) | Builder / developer | Plaster and decorative cracking caused by drying shrinkage or workmanship, made good typically once, sometimes twice for persistent items |
| Years 2–10/12 (structural warranty) | NHBC / LABC Warranty / Premier Guarantee etc. | Only cracking linked to a genuine structural defect — foundation movement, structural timber failure, load-bearing wall issues. Cosmetic shrinkage cracking is generally excluded once past year two |
| Beyond structural warranty term | Homeowner | No warranty cover; homeowner's building insurance may apply if damage is sudden and accidental rather than gradual settlement |
If your developer has entered administration or is refusing to engage, your recourse shifts to the warranty provider directly rather than the (possibly defunct) building company — What Happens Legally If Your New Build Developer Goes Into Administration covers this scenario, and the New Homes Quality Board's Code and independent resolution scheme (where your developer is a registered member) can also help if a dispute over a covered defect stalls.
Second-year buyers specifically should read Second Year Snagging: What to Check Before Your Warranty Expires before the builder's two-year cover lapses — it's your last chance to get plaster and paintwork issues addressed under the more generous early-stage cover.
How developers "make good" plaster cracks
Once a crack is accepted as a valid snagging item, the standard remedy is straightforward but worth understanding so you know what good practice looks like and can push back on anything less.
The typical rectification process
- Inspection. A site manager or customer care representative visits to confirm the defect and assess its cause.
- Raking out. Rather than simply skimming filler over the top, a competent contractor will open the crack out slightly (raking out) to remove loose material and provide a key for new filler.
- Reinforcement where needed. For cracks along plasterboard joints, scrim tape or mesh may be re-applied before re-skimming, to reduce the chance of the same crack reopening.
- Filling and skimming. The area is filled, allowed to dry, and skimmed to a flush finish.
- Sanding and priming. A properly finished repair is sanded smooth and given a mist coat (diluted primer) before final paint, because new filler and old paint absorb paint differently and will flash or show through otherwise.
- Full redecoration of the affected wall. A patch of fresh white paint on an otherwise painted wall stands out. Reasonable practice is to repaint the full wall, or at minimum a natural break point such as a corner, not just a small patch around the crack.
What a poor repair looks like
- Filler smeared over the crack without raking it out first — often visible as a slightly raised or uneven ridge.
- No mist coat, leaving a visibly different sheen or shade where the repair was painted.
- A repair that reopens within weeks because the underlying movement wasn't addressed at all, only masked.
- Repairs carried out on a single visit for a whole list of cracks without allowing filler to cure between coats, leading to shrinkage cracking in the repair itself.
Ask your builder's customer care team what their standard process is before work starts, and if multiple rooms need attention, request they be done in a single planned visit rather than piecemeal, to minimise disruption and mismatched paint batches.
Should you wait, or fix cracks yourself?
It's tempting to reach for a tube of decorator's caulk the moment you spot a crack, especially if you're keen to get your new home looking finished. In most cases, it's worth resisting that urge until the crack has been through the reporting and monitoring process.
Reasons to hold off on DIY repairs
- Once filled and painted, it's much harder to prove to a warranty provider that the crack existed and when.
- Your own repair may not be covered if it later needs redoing — you've effectively taken over responsibility for that patch.
- Filling early can mask a crack that's still actively moving, making it harder to spot if it's part of a wider structural pattern.
- Builders will often want to inspect the crack in its original state before agreeing it's their responsibility to fix.
When DIY touch-ups are reasonable
- The crack has already been formally reported, inspected and accepted as cosmetic, and the builder has confirmed they won't be attending for such a minor item, or cover has genuinely expired.
- You've kept your own dated photo record before touching it.
- It's a genuinely trivial hairline crack in an area you're happy to take responsibility for, such as a cupboard interior.
For most first-year cracks in main living areas, the better approach is: report, photograph, wait for the builder's inspection, and let them carry out or fund the repair as part of your two-year cover. This preserves your evidence and your entitlement, and avoids you paying (in time or materials) for something that's contractually the builder's job.
Patience during the reporting stage costs you nothing except a slightly less "finished" look for a few extra weeks — a fair trade for keeping your warranty claim intact.
If you do decide to decorate before a formal inspection because the crack is trivial and cover has expired, standard flexible decorator's caulk designed for plaster movement (rather than rigid filler) is less likely to crack again quickly, though it's not a substitute for a proper rake-and-skim repair on anything wider than a hairline.
Living in a new build during its "drying out" year
You can't prevent shrinkage cracking entirely — it's a byproduct of how new homes are built — but sensible habits in the first year reduce how much you get and make monitoring easier.
Heating and ventilation
Avoid blasting the heating up to maximum immediately after moving in, especially in winter. A gradual, steady increase in background heat allows timber and plaster to dry more evenly, reducing the risk of sudden, larger cracks caused by rapid moisture loss. Keep trickle vents open and use extractor fans in kitchens and bathrooms to manage the additional moisture from cooking, showering and, in the very first months, residual construction moisture still leaving the building fabric.
Humidity awareness
New homes are often more airtight than older housing stock, meaning moisture from daily living can build up if ventilation is neglected. Persistent condensation is a separate issue from shrinkage cracking, but poor humidity management can worsen both, and can mask early signs of a crack behind misted windows or damp patches.
Don't over-decorate too early
If you're planning to redecorate beyond the standard finish, it's worth waiting at least six months, and ideally until after the first winter, before applying wallpaper or premium paint finishes to walls prone to shrinkage cracking. Painting over a crack that then reopens wastes both money and the paint warranty some manufacturers offer.
Keep a simple household log
Beyond crack monitoring specifically, it's worth keeping a broader record of when you first used the heating, any periods the property stood empty (which slows drying), and any significant weather events (prolonged heatwave, hard frost) that might explain sudden new cracking. This context is genuinely useful if you ever need to explain a defect's timeline to a warranty assessor.
For the practical side of setting your home up during this period — ventilation systems, smart thermostats and utility connections — see Essential Technology and Utilities Checklist for Your New Build Home.
What to do if the builder disputes your crack report
Occasionally a developer's customer care team will dismiss a reported crack as "normal settlement, no action needed" even when your own monitoring suggests otherwise, or will repeatedly delay attending. You have several avenues before this needs to become a formal dispute.
Escalation steps
- Put it in writing. If a rejection or delay has only been communicated verbally, ask for it in writing, referencing your plot number and original report date.
- Request a second opinion within the company. Ask to escalate from the site-based customer care contact to the regional or national customer service manager.
- Contact your warranty provider directly. NHBC, LABC Warranty and Premier Guarantee all have their own claims and resolution processes independent of the builder, and can arrange an inspection even if the builder is dragging their feet, particularly where a crack might be structural.
- Use the New Homes Quality Board (NHQB) process. If your developer is registered with the New Homes Quality Code (most major builders now are), you can raise an unresolved dispute with the independent New Homes Ombudsman Service once you've exhausted the builder's internal complaints process.
- Consider an independent surveyor. A RICS-qualified surveyor's report, particularly one that specifically comments on whether cracking is consistent with normal shrinkage or indicates a structural issue, carries real weight in any subsequent dispute.
| Escalation route | Best used for | Typical timescale |
|---|---|---|
| Builder customer care | First report, straightforward cosmetic cracks | Days to a few weeks |
| Warranty provider claim | Disputed cause, suspected structural issue, builder unresponsive | Several weeks for inspection and decision |
| New Homes Ombudsman Service | Unresolved complaints after builder's internal process is exhausted | Weeks to a few months |
| Independent RICS surveyor | Evidence for a disputed or structural claim | Arranged privately, report within 1–2 weeks of survey |
Keep every piece of correspondence, and don't be afraid to be persistent and specific — reference dates, plot numbers and previous communications every time you follow up. A calm, well-documented paper trail is far more effective than frustration expressed on the phone.
Frequently Asked Questions
Is it normal for a new build to crack in the first year?
Yes. Almost every new home develops some hairline plaster cracking in its first 12–18 months as timber, plaster and screed dry out and the structure goes through its first heating cycle. This is generally cosmetic and is typically covered under your builder's two-year warranty.
How wide does a crack need to be before I should worry?
As a general guide, cracks under 1mm confined to plaster are usually shrinkage-related and cosmetic. Cracks over 3mm, or ones you can fit a coin's edge into, deserve a professional assessment, particularly if they're diagonal, stepped through brickwork, or paired with sticking doors and windows.
Should I report every small crack, even if it looks trivial?
Yes. Reporting costs you nothing and creates a documented, dated record that protects your position if the crack turns out to be more significant, or if a dispute arises later about whether it existed within your warranty period.
Will the builder fix cracks for free?
Cosmetic cracking caused by normal shrinkage or workmanship is typically made good free of charge under the builder's initial two-year warranty, provided you report it within that window. After two years, cover generally narrows to structural defects only, under the longer-term NHBC, LABC Warranty or Premier Guarantee cover.
Can I fill and paint over a crack myself?
It's best to hold off until you've reported the crack and, ideally, had it inspected, since decorating over it makes it much harder to prove the defect existed and to have it properly repaired (rather than just re-masked) by the builder.
What's the difference between a snagging crack and a structural crack?
A snagging crack is confined to plaster or paint finish and doesn't affect the underlying structure — it's a cosmetic finishing issue. A structural crack runs through brick or block itself, may appear on both sides of a wall, often tapers in width, and is frequently accompanied by sticking doors or windows. Structural cracks need a professional structural assessment, not just a repaint.
Does my new build warranty cover cracking after year two?
Only if the cracking is linked to a genuine structural defect covered by the 10–12 year structural warranty (NHBC Buildmark and equivalents). Ordinary cosmetic shrinkage cracking is generally excluded once the property is assumed to have fully dried out and stabilised, which is usually treated as being by the end of year two.
What if my developer has gone into administration and won't respond?
Your recourse shifts to the structural warranty provider directly, since NHBC, LABC Warranty and Premier Guarantee cover is designed to remain valid even if the original builder ceases trading. See What Happens Legally If Your New Build Developer Goes Into Administration for the detail on how this works.
Next steps
Cracks are one of dozens of things worth checking systematically in a new build home, and getting your reporting right in the first two years is your best chance of a genuinely snag-free finish before your builder's cover narrows.
- Start (or add to) a dated photo and measurement log for every crack you notice, however small, and revisit it monthly.
- Build a full, structured snagging report rather than reporting issues piecemeal — see How to Create a Professional Snagging Report and How to Use a Snagging App to Track Defects for tools to help.
- If you're approaching the end of your builder's two-year warranty, prioritise a full walk-through now — Second Year Snagging: What to Check Before Your Warranty Expires sets out exactly what to check before cover narrows.
- Not sure which issues to tackle first? How to Prioritise Snagging: Urgent vs Cosmetic Issues helps you sequence a mixed list of cosmetic and potentially serious defects.
If you're still researching developments, comparing builders' reputations for build quality, or want to see how a particular site or plot has been reviewed by other buyers, the wider new-builds.co.uk toolset can help:
- Browse live developments across the UK on /developments.
- Compare builder track records and customer satisfaction on /builders.
- Search available new build properties on /properties.
- Explore locations and site plans visually on /map.
- Access calculators and planning tools, including budgeting and warranty guides, on /tools.
- Put two or more developments or builders side by side on /compare.
A crack on its own rarely tells the whole story — but a dated log, a clear escalation path, and knowing exactly what your warranty covers turns an anxious guessing game into a straightforward, evidence-backed process.